This article introduces how to add the effects on Shadertoy into Spark AR Studio.
It has been several years since Spark AR Studio was launched, and its functions are relatively mature.

Its UI as shown above, with a familiar three-dimensional scene editor, and a node-visual-programming patch editor.
This kind of AR special effects software is generally platform-bound (that is, it can only publish effects on their respective platforms, such as Instagram, Snapchat, etc.).
It is to encourage users to actively create content. And usually core technologies such as AR , Face recognition and other modules are all ready-made, or drag and use.

👆Drag a Face Tracker out, well, face recognition is complete.
The Face Tracker comes with a Face Mesh, then let’s focus on the material of this mesh.
Create a new material and set its Shader Type to Shader Asset.
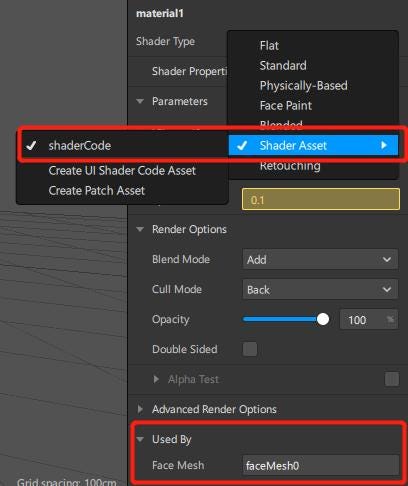
Add a Shader to the Asset, this example file is called shaderCode.

If the Shader uses textures, just drag the texture image into the Asset area, such as the letters and noise in the picture.
Next, write Shader.
Here just introduce the key steps of converting Shadertoy.
There are some unique variables and functions in Shadertoy:iTime, iResolution, fragCoord, iChannel, texture() etc.
And the main function entry:
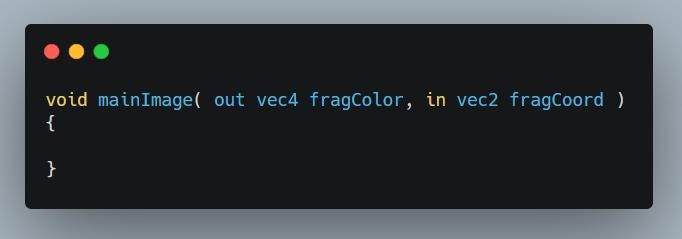
In the Shader of Spark AR, you can write like this:

OK that’s the core conversions, and most of the remaining special effects can be coded by general shaders.
We use parameter settings for iChannel0 and iChannel1.

In this example, two sets of effects are used, and they are switched by the open mouth and close mouth action.
The float open of the main function in the Shader is used to switch between the two effects.
The recognition of mouth opening has also been implemented by Spark AR built-in, just add it in the patch editor:

The logic is clear. When open, send 1 to the open parameter of material1.
(You need to set the open parameter in the material settings to be available in the patch editor.)
The three parts of face recognition, Shader special effects, and mouth opening action logic have combined the effects of this article.
When publishing to a mobile phone, the video source is the mobile phone camera.
REF:
- https://sparkar.facebook.com/
- https://www.shadertoy.com/view/ldccW4
- https://www.shadertoy.com/view/MdsSRl
Good luck!
This article introduce the key implementation process. For other entry-level questions, you can directly refer to the official software documentation.
If you still need the source patch, you can get them from my patreon or gumroad.
DONATE:
– https://www.patreon.com/avantcontra
There are many articles, patches, source code and some advanced Patron-only content there.
– Or you can get a source code/patch directly in gumroad. https://gumroad.com/avantcontra
MORE articles in my site:
https://floatbug.com
https://www.youtube.com/avantcontra
https://instagram.com/avantcontra
https://twitter.com/avantcontra
https://facebook.com/avantcontra
https://www.linkedin.com/in/contra/
[Experimental Programming], meaning is derived from experimental art, experimental electronics, or experimental music. And that’s how I create things through programming.